

What you will accomplish
- An agent with a name, direction, provider, voice, first message and prompt.
- A browser test that confirms the greeting, a main question and an edge case.
- An inbound number or a reviewed outbound campaign connected to the agent.
- A first call record with its recording, transcript and analysis.
Prerequisites
- Access to the correct workspace (Sign in to Inspra).
- A clear use case and an approved opening message.
- Access to the provider you will use: the native voice service for Native Agent, or a connected key for Vapi or Retell (Connect services to the workspace).
- A working microphone and permission to use it in your browser.
1. Create the agent
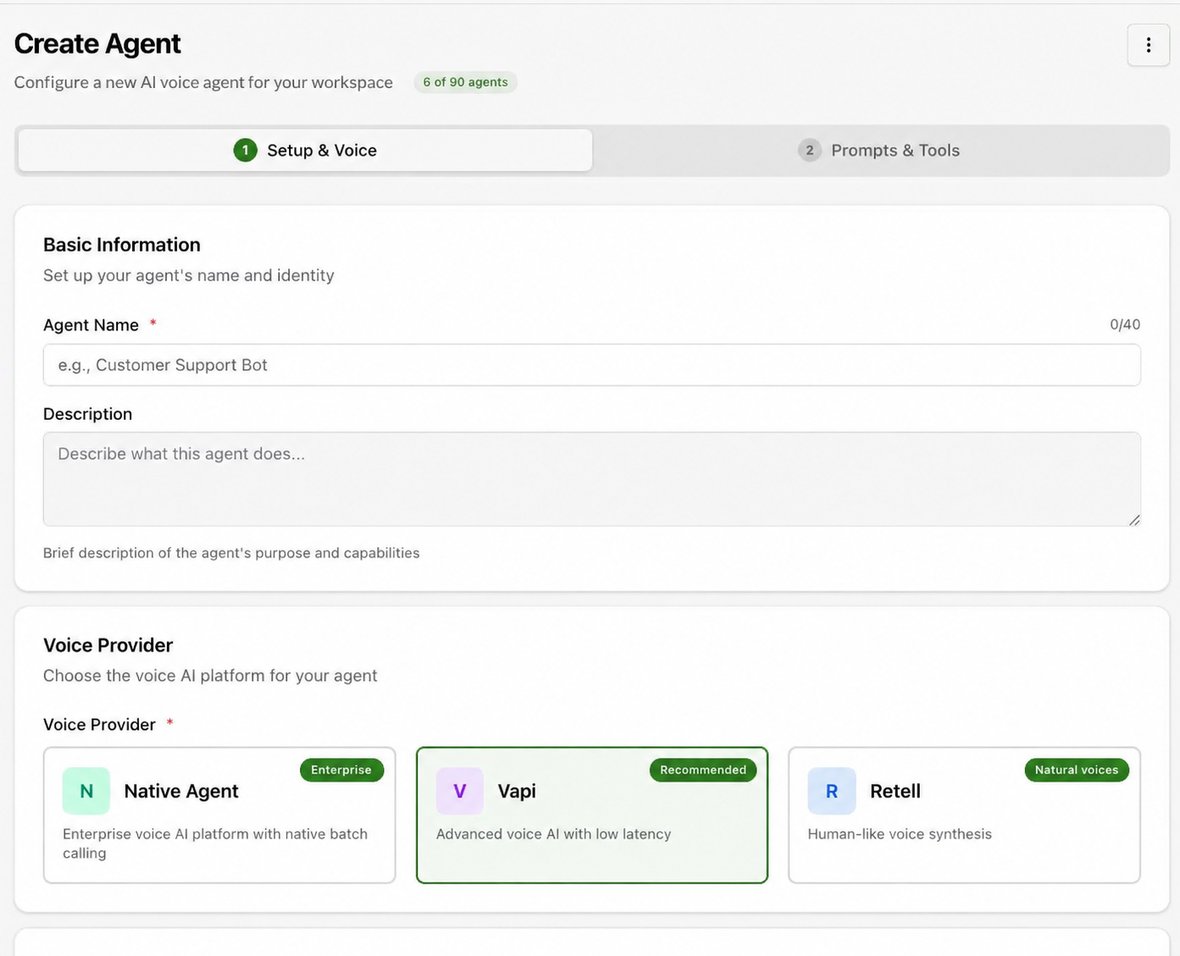
Open Agents → Create Agent. Enter an Agent Name of up to 40 characters and an optional Description, then follow the path for your provider. Native Agent is documented first.
Prefer to describe the job? Select Agents → Inspra Copilot, an AI assistant that asks guided questions and prepares a configuration from your brief. Review it before you confirm, then continue from stage 2. See Inspra Copilot, which includes an example brief.
Native Agent is described on the form as an enterprise voice AI platform with native batch calling. This path needs access to the native voice service.
-
In Voice Provider, select Native Agent.
-
Choose Inbound to receive calls or Outbound to make them. For an inbound agent that should also join campaigns, review Allow Outbound Campaigns.
-
Choose the language model and a compatible voice. For a Native Agent, the Voice tab offers ElevenLabs and Native audio as voice sources; compare Native voices first in Resources → Voice Library.
-
Select Continue to reach Prompts & Tools. A Native Agent offers End Call, Transfer Call, Check Availability and Book Appointment as built-in tools, and its calendar tools list Cal.com.
Vapi is described on the form as advanced voice AI with low latency. A Vapi agent uses a Vapi connection held in Integrations.
Before you start: confirm that a Vapi key is connected under Configuration → Integrations → Voice agents. A key inherited from the organisation is marked Org default; the workspace’s own default is marked Default.
-
In Voice Provider, select Vapi.
-
Choose Inbound or Outbound.
-
Where the form offers a key selector, choose the Vapi integration this agent should use. If the key you need is missing, add it in Integrations with Connect or Add another key.
-
Choose the language model and a compatible voice from the options the form shows for Vapi. If the current voice is not found in the connected key, check the integration or choose another available voice.
-
Select Continue and configure the tool fields shown for Vapi. Do not assume they match the Native Agent tool list.
Retell is described on the form as human-like voice synthesis, with a Natural voices badge.
Before you start: confirm Retell access for your organisation and, where the form offers a key selector, the Retell connection to use. Retell keys are connected under Integrations in the same way as Vapi keys; ask your administrator which key to use.
-
In Voice Provider, select Retell.
-
Choose Inbound or Outbound.
-
Where the form offers a key selector, choose the Retell integration this agent should use.
-
Choose the language model and a compatible voice from the options the form shows for Retell.
-
Select Continue and configure the tool fields shown for Retell. Do not assume they match the Native Agent or Vapi tool lists.
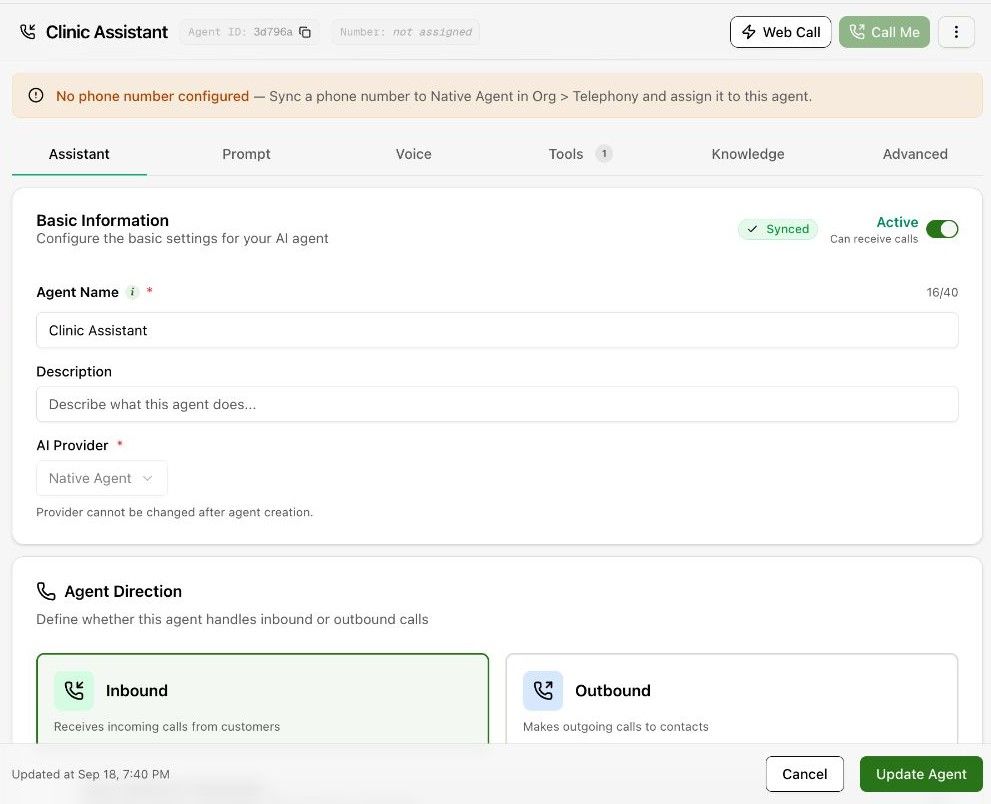
The existing-agent editor states that the provider cannot be changed after creation. Choose it deliberately. When the agent opens, confirm its configuration and provider sync status before testing.
2. Write the opening message and prompt
Set the First Message and System Prompt. Give the agent a clear scope and tell it how to handle missing information. Attach the relevant knowledge documents, and add tools only for actions the agent needs to perform. See Write the opening message and prompt and Attach knowledge and add instant answers.
3. Test in the browser
Save the configuration. When you are ready to use your microphone, select Web Call, try the main conversation and an edge case, and select End Call. Web Call starts a live browser test immediately.
4. Deploy
Connect a deployment channel only after the test behaves as expected. For inbound calls, add the number with its SIP trunk and inbound agent (Add a number and receive inbound calls). For outbound calls, import recipients into a campaign (Prepare and import campaign recipients). Adding a number to the platform is not the same as purchasing or provisioning it with the carrier.
5. Review the first calls
Open Calls, find the call, and review its recording, transcript and analysis. A Processing disposition means analysis is not yet available. See Find and export call records and Review a recording and transcript.