

Choose a workspace for each client
A workspace contains a client's agents, campaigns, calls, and members. Use separate workspaces when clients need separate access and service settings. Your organization manages the shared brand and the integrations available to each workspace.
Open Organization > Overview > Workspaces to search and manage your client list. Organization owners and admins can access this dashboard. Workspace creation requires an organization owner and available capacity on the agency plan. For staff access, follow the Team and permissions guide.
Open a workspace from Organization
Find Back to Workspaces
Look below the navigation links in the left Organization sidebar. Scroll within the sidebar if needed. On mobile, open the navigation menu first.
Open workspace selection
Select Back to Workspaces. This takes you to
/select-workspaceon your organization's domain.Choose the workspace
Select a workspace you have access to. The platform opens that workspace so you can work with its agents, calls, and campaigns.
To open a workspace directly from the organization list, go to Overview > Workspaces. Expand the workspace row, then select Open Workspace. The open icon beside the workspace name is another shortcut to its dashboard.
Switch between client workspaces
Inside a workspace, select the current workspace name near the top of the sidebar. Choose another workspace from the switcher, using its search field when needed.
Workspace selection shows the workspaces available to your account. If a client workspace is missing, check your membership and the organization domain. If you have exactly one regular workspace and no trial workspaces, the selection page opens that workspace automatically.
Create a workspace
Open Workspaces
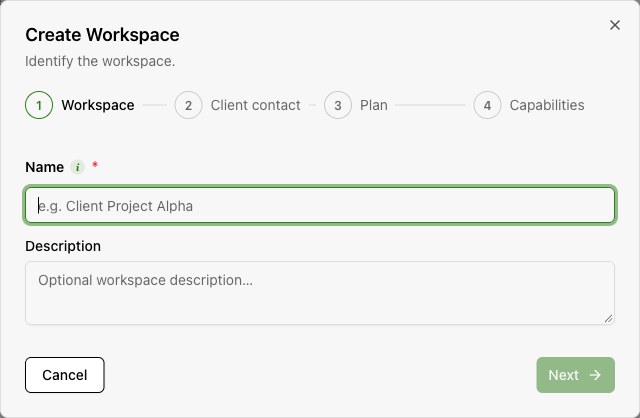
As an organization owner, open Overview > Workspaces and start workspace creation. The assigned agency plan must have available capacity.
Enter identity and billing contact
Name the workspace, add its description, and complete the client's business and billing contact details.
Select the plan and people
Choose the client plan, workspace owner, additional members, and creation notification preference.
Choose optional capabilities
Enable the capabilities the client needs, such as SMS campaigns, then finish creation.
Complete payment or activation
For prepaid plans, the client receives a payment link and the workspace remains in provisioning until payment completes. Free, postpaid, and no-plan workspaces await manual activation through Activate on the workspace row.
Activate the client's service
| Plan type | Next step after creation |
|---|---|
| Prepaid | The workspace stays in provisioning until the client completes payment. Use Resend payment link on the workspace row if needed. |
| Free, postpaid, or no plan | The workspace awaits manual activation. Review its setup, then use Activate on the workspace row. |
Confirm that the workspace is active before handing it over. If creation reports that some members could not be added, review membership and add the missing people before sharing access.
Give people access to the workspace
Expand the workspace row and select Manage Members to open its member list. Organization invitations, workspace assignments, and permission editing are explained in the separate Team and permissions guide.
Explore the expanded workspace card
Open Overview > Workspaces, search for the client, and select the arrow beside its name. The expanded card brings together the workspace's service, billing, and access controls.
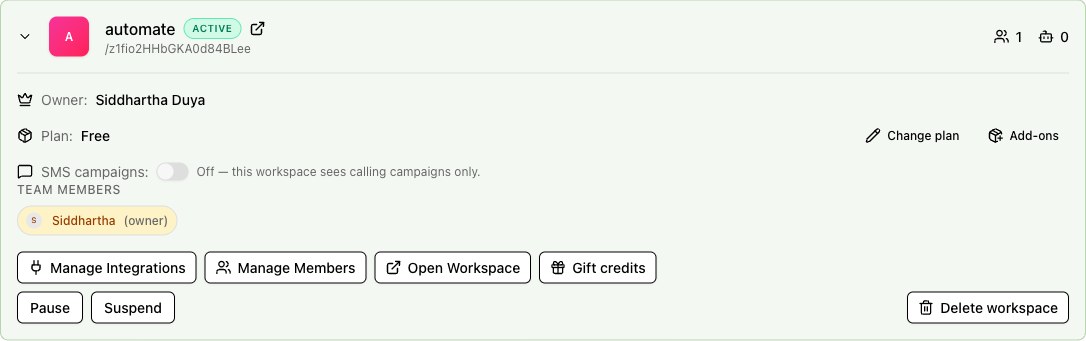
| Item | What it shows or opens |
|---|---|
| Workspace name and identifier | Identify the client workspace. The open icon beside the name is a shortcut to its dashboard. |
| Status badge | The current workspace state, such as Active, Provisioning, Inactive, or Suspended. |
| People and agent counts | The number of members and agents in this workspace. |
| Owner | The person shown as this workspace's owner. |
| Plan and subscription badge | The attached client plan and any subscription status notice. Change plan or Attach plan opens the plan selector. |
| Add-ons | Review or apply additions to an attached plan. |
| SMS campaigns | Enable or disable the SMS campaign capability for this workspace. |
| Team members | Assigned members and their workspace roles. Use Manage Members to edit access. |
| Manage Integrations | Assign the organization's provider connections to this workspace. |
| Open Workspace | Enter the client's dashboard to manage agents, calls, and campaigns. |
| Gift credits | Add complimentary balance. This action is restricted to platform super admins. |
| Status and deletion actions | Pause, Suspend, Activate, Resend payment link, or Delete workspace, depending on workspace state and your role. |
Change or attach a plan
Open the plan selector
Select Change plan, or Attach plan when no plan is attached. The dialog lists active plans from your organization.
Review the new plan
Compare the plan name, displayed price, included allowances, and billing type. The current plan is marked Current. Choose a different plan to enable the save button.
Check the payment path
For a prepaid plan, review the provisioning notice. Enable Re-send payment email if you want the billing contact to receive the new checkout link.
Apply and verify
Select Change plan or Attach plan. Check the updated plan and subscription status on the card. A prepaid workspace awaits payment before service activation.
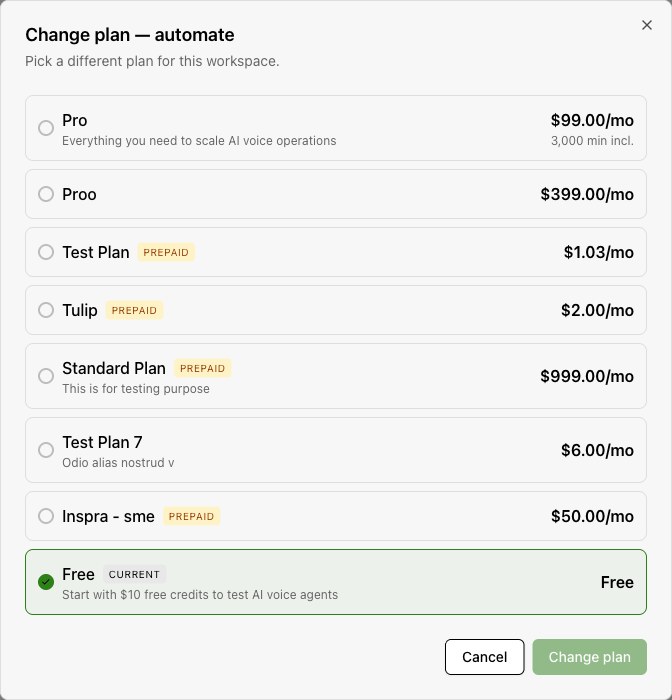
If no active plans are available, configure one in Subscription Plans. A new prepaid selection replaces a previous pending checkout when the old subscription is incomplete.
Review and apply workspace add-ons
Select Add-ons beside the plan. What it has lists existing additions, their quantities, and whether they came with the plan, were bought by the workspace, came from an accepted quote, or were applied by your organization.
Choose an add-on
Under Apply an add-on, choose an available item and enter the quantity. Review any remaining capacity shown for the plan.
Review how it is charged
The dialog states whether the charge comes from workspace credits or goes on the next invoice. For a free grant, enable Complimentary (no charge) and enter a reason.
Apply the selection
Select Apply. Successful additions switch on immediately. Check the updated list and the success message.
Remove an eligible addition
Use Remove where available in the existing list. The result states whether it was removed immediately or ends at renewal. Items included in the plan do not have this removal control.
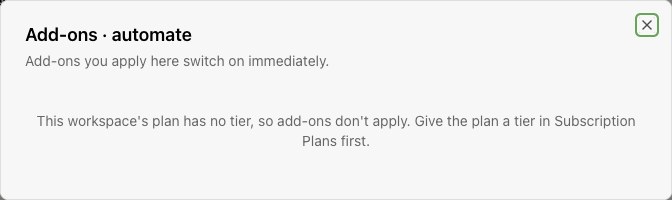
If the dialog says the workspace is not billed and already has every feature, there is no add-on setup to complete here. If the plan has no tier, configure its tier in Subscription Plans. Organization-wide requests, pricing, and quotes are covered in Add-ons and quotes.
Enable or disable SMS campaigns
Use the SMS campaigns switch on the expanded card. When off, the workspace sees calling campaigns only. When on, the workspace can create SMS campaigns. The change saves immediately and a notification confirms the result.
Before enabling SMS, arrange a messaging-capable phone number and any registration required by your carrier. This switch controls access to the campaign feature. It does not purchase a number or complete carrier registration. See Telephony for number setup.
Assign provider connections
Open Manage Integrations
Select Manage Integrations on the workspace card. The dialog shows a selector for each supported provider.
Choose an existing connection
Select the organization's active key for the provider. Each provider can have one assigned key in this dialog. If no key is configured, use Add one to open Organization Integrations.
Check the saved assignment
Selections save immediately. Wait for the success message before closing with Done. Choosing No key assigned removes that provider assignment.
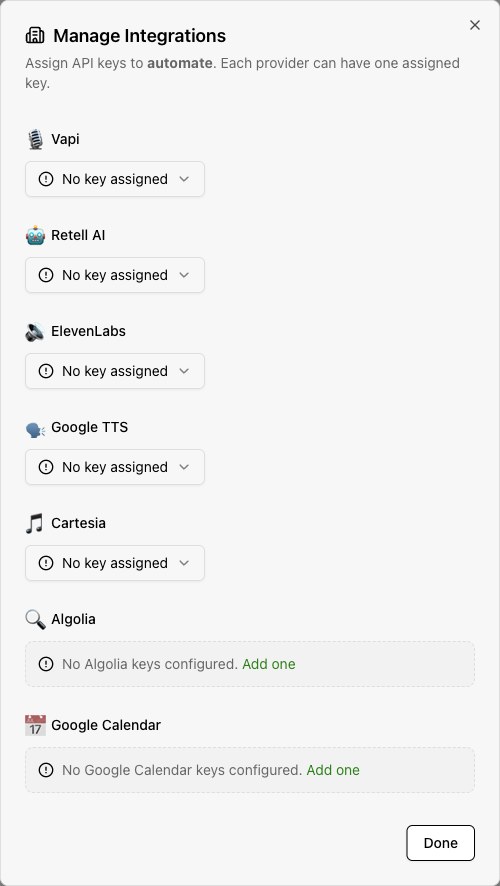
The captured dialog includes Vapi, Retell AI, ElevenLabs, Google TTS, Cartesia, Algolia, and Google Calendar. For the wider provider list and connection requirements, see Available integrations. Review agents that depend on a connection before replacing or removing it.
Gift complimentary credits
Gift credits appears for platform super admins. It is not a standard organization owner or admin entitlement. The button can therefore appear in a platform screenshot while being absent from an agency account.
Enter the amount
Select Gift credits. Choose a preset or enter a custom amount in USD between $0.01 and $10,000.
Add context and choose notification
Add an optional note of up to 200 characters. The workspace sees this note beside the credit. Enable Email the workspace to notify its owners and admins.
Confirm the gift
Review the amount shown on the Gift button, then select it. The success message confirms the new balance. The workspace's billing history shows a gift from the organization brand.
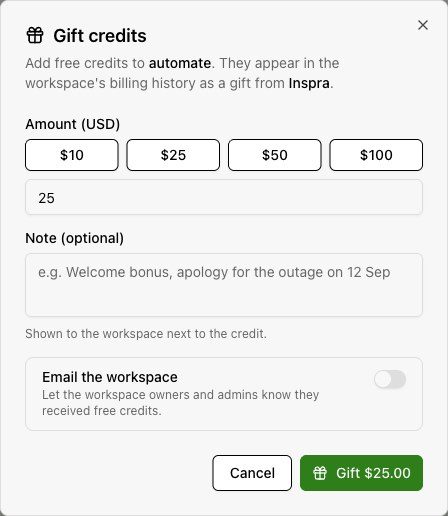
If the gift succeeds but the notification email fails, the credits are already added. Check the reported balance before trying again.
Pause, suspend, or reactivate a workspace
| Action | When the card shows it | Result |
|---|---|---|
| Pause | Active workspace | Changes the workspace to Inactive. The workspace paywall asks for reactivation. |
| Suspend | Active workspace | Changes the workspace to Suspended. The workspace paywall asks the client to contact their account manager. |
| Activate | Provisioning, Inactive, or Suspended workspace | Changes the workspace to Active when activation requirements are met. A prepaid plan still requires completed payment. |
| Resend payment link | Provisioning workspace | Sends another payment link for the pending payment flow. Sending the link does not complete payment. |
Pause, Suspend, and Activate submit immediately from the card. They do not open a separate confirmation dialog. Check the workspace name before selecting one. These status changes do not cancel the subscription or release phone numbers.
Use Client offboarding when the client is leaving. Track billing, agents, access, and carrier numbers as separate tasks.
Delete a workspace
Only organization owners see Delete workspace. Before deletion, finish the required exports and review the client's subscription and phone numbers.
Open the deletion dialog
Select Delete workspace on the intended card. Read the workspace name and the removal notice.
Handle billing separately
Deletion does not cancel an active workspace subscription. Complete the required billing changes before treating the client relationship as closed.
Confirm the exact workspace name
Type the name requested in the dialog. Select Delete workspace only when ready to remove the workspace and its data from the app.
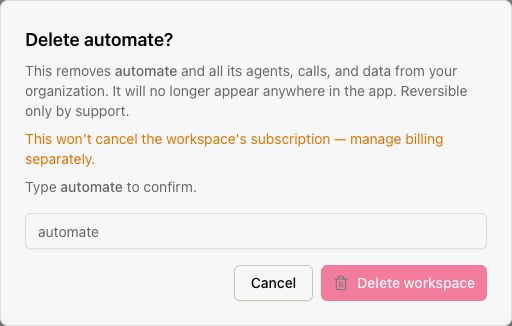
The workspace, its agents, calls, and data disappear from the app. Restoration requires support. For a planned wind-down and retention workflow, follow Client offboarding.
Check the workspace before handover
- Open the workspace and confirm its name and branding.
- Check its plan and activation state.
- Confirm that the required integrations and phone numbers are assigned.
- Check that each client member has the intended access.
- Test an agent and review the call result. Track remaining work in Client onboarding.
If you are redirected to workspace selection, check the organization host and your organization role. If creation is unavailable, check ownership and remaining workspace capacity.