

Understand the calling setup
| Term | What it means here |
|---|---|
| SIP trunk | The connection between the platform's voice gateway and your phone carrier. |
| Phone number or DID | The number people dial, or the number presented on outbound calls. |
| Workspace | The client that receives the number and its agent assignments. |
| Tenant | The telephony scope used for shared settings such as blocked numbers and answering-machine detection. |
| Caller ID or CLI | The calling identity presented to the person receiving a call. |
For an inbound agent call, the carrier sends the call through the trunk to the assigned number, workspace, and agent. Outbound calls also need a usable carrier connection and an allowed caller ID.
Before setup, have the carrier's connection details, authentication method, and phone numbers ready. Create the client workspace and its agents, and connect any required voice provider under Integrations.
Find the right controls
| Tab | Purpose |
|---|---|
| SIP trunks | Carrier connections used for calls. |
| Phone numbers | Number management and workspace assignments. |
| Call rules | Tenant-scoped blocked numbers, answering-machine detection, and SIP header information. |
| Delegation | Telephony settings that client workspaces can manage. |
| Atom numbers | Provider-specific number management and release tracking when configured. |
The summary cards show numbers, trunks, assigned numbers, and recent live-call activity. Use the search field in each inventory tab to locate an existing trunk or number.
Add and verify a SIP trunk
Open Add SIP trunk
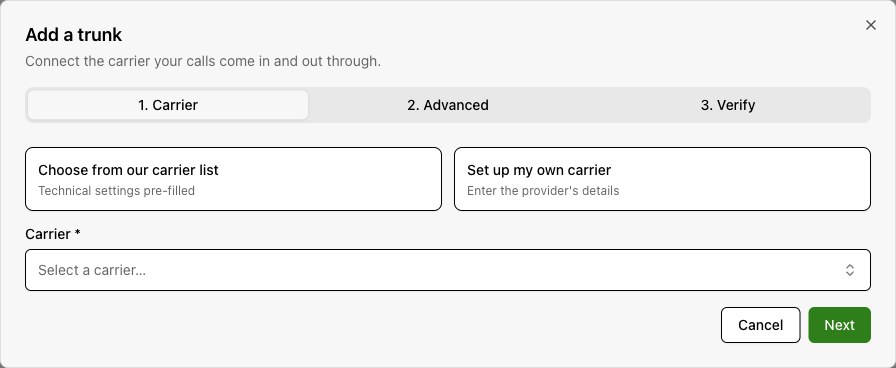
In SIP trunks, select Add SIP trunk. The editor has Carrier, Advanced, and Verify tabs.
Choose the carrier
Select Choose from our carrier list for a template, or Set up my own carrier to enter the SIP host yourself. Templates fill the technical defaults. Use the carrier list shown for your deployment.
Enter authentication and direction
Name the trunk and choose Inbound, Outbound, or Both. Select the intended tenant when offered. For registration, enter the carrier username and password. For fixed-IP authentication, enter the carrier's peer IP.
Review Advanced
Select Next. Match transport, port, codecs, touch-tone handling, and number formats to your carrier. Review caller ID, transfer behavior, and concurrency settings before selecting Save trunk.
Verify the saved trunk
Reopen the trunk and select Verify. Give your carrier the current addresses under Allow our network, then select Run check. Read the registration result and any failure reason. If PBX sync is disabled, the result is not checked.
| Advanced setting | What to check |
|---|---|
| Transport and port | Use the carrier's required SIP transport and port. |
| Codecs and DTMF | Use supported audio codecs and the required touch-tone signaling method. |
| Domain, proxy, and NAT settings | Match the carrier's connection requirements. Keep template values unless the carrier specifies a change. |
| Caller ID | Choose transparent, fixed, or workspace-controlled identity where offered. A fallback caller ID can cover cases where the original identity cannot be sent. |
| Number format and transfers | Match the carrier's inbound, outbound, and transfer requirements. |
| Max concurrent calls | Set the limit appropriate to the carrier service. |
The separate Outbound Caller ID card in the trunks tab edits the first trunk returned by the organization list. To configure a specific trunk, open that trunk's editor.
Add a number and assign its workspace
Open Add phone number
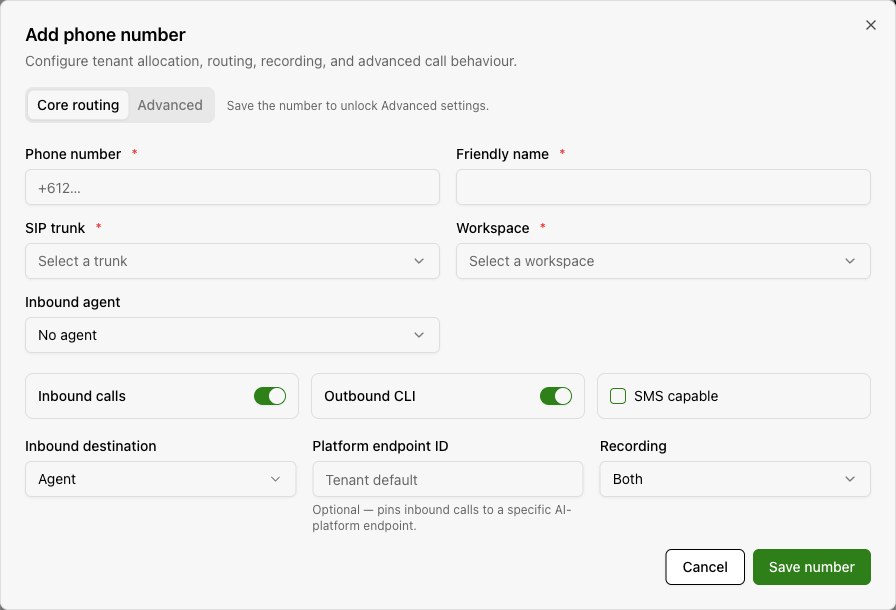
Select Phone numbers > Add phone number. Begin in Core routing.
Complete the required fields
Enter the phone number and a friendly name. Select its SIP trunk and Workspace. All four fields are required.
Choose the inbound agent
Select an agent belonging to that workspace. If the list is empty, create the agent in the intended workspace first. Changing the workspace clears the previous inbound-agent selection.
Set the calling options
Review Inbound calls, Outbound CLI, and SMS capable. Choose the inbound destination and recording mode, then save.
Confirm the assignment
Check the number's workspace, trunk, and agent in the inventory. Open the client workspace and confirm the intended number is available.
| Routing option | How to use it |
|---|---|
| Agent | Send calls to the selected inbound agent. Platform endpoint ID is optional and otherwise uses the tenant default. |
| Person/extension | Use the person or extension destination supported by your deployment. |
| External number | Supply the required Forward E.164 number. Choose whether forwarding presents the original caller or this DID. |
| SIP URI | Supply the required SIP destination URI. |
| Recording | Choose None, Inbound, Outbound, or Both for the recorded call directions. |
Entering a number records its routing configuration. Confirm that the carrier has provisioned the number and routed it to the trunk. The SMS capable flag alone does not configure an SMS delivery service.
Configure hours, rerouting, and failover
Save the number first, then reopen it and select Advanced.
| Control | What to configure |
|---|---|
| Office hours | Enable a schedule and set its timezone, start and end times, and days of the week. |
| When closed, route to | Choose a message followed by hang-up, an AI platform endpoint, a SIP endpoint, or an external number. Enter the fields required for that destination. |
| Ring an external number first | Enter the destination and how many seconds to wait before giving up. |
| Failover | Enable the fallback destination and supply its number, SIP URI, or message settings. |
| Message source | Where offered, choose Google TTS, ElevenLabs TTS, or an uploaded audio file, then provide the corresponding message. |
Select Save advanced settings for routing changes. Per-number webhooks has its own Save webhooks action. These endpoints override tenant-wide hooks for that number; with no per-number endpoints, delivery falls back to tenant-wide hooks.
The Advanced tab also provides Do Not Answer and Do Not Call lists associated with the number. Each entry needs a phone number and a reason.
Set tenant-wide call rules
Open Call rules and choose the correct Tenant scope before changing a rule.
| Control | Behavior |
|---|---|
| Blocked numbers | Enter a phone number and required reason. Choose DNA for Do Not Answer, DNC for Do Not Call, or Both. Add a DID tag if needed. |
| Answering machine detection | Configure outbound voicemail detection, its Native or Khomp mode, and the transfer-skip option. Enter exempt phone numbers one per line, then select Save AMD. |
| SIP headers | View the fixed metadata passed between the gateway, agents, and carrier. The listed headers are read-only and cannot be toggled here. |
Choose what clients can manage
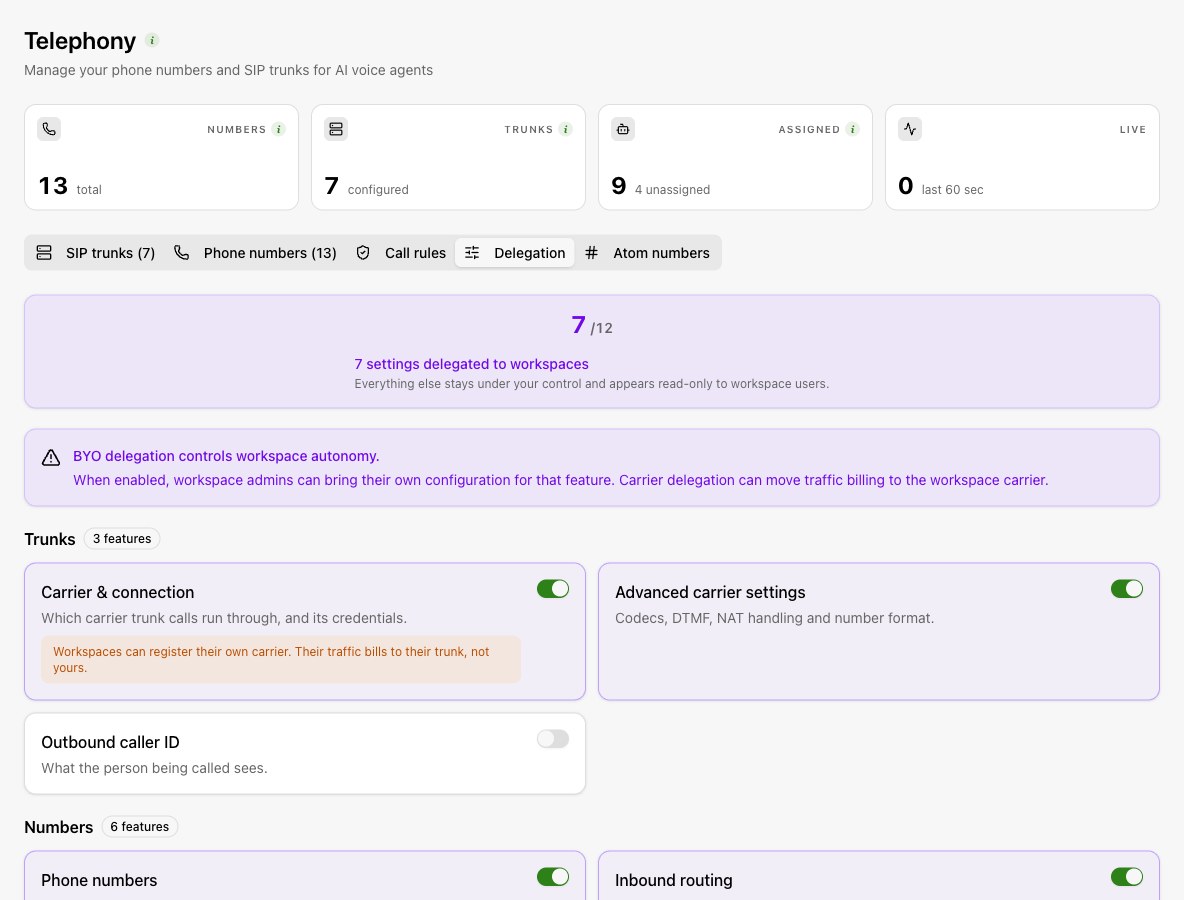
Open Delegation. Turning a switch on allows workspace admins to supply or change that feature's configuration. Turning it off keeps control at organization level. Changes save when you toggle a switch.
| Group | Delegated controls |
|---|---|
| Trunks | Carrier & connection, Advanced carrier settings, and Outbound caller ID. |
| Numbers | Phone numbers, Inbound routing, Failover & reroute, Call recording, Office hours, and Call webhooks. |
| Call rules | Blocked numbers, Answering machine detection, and SIP headers. The displayed header set remains fixed. |
Advanced carrier settings requires Carrier & connection. Turning carrier delegation off also turns advanced carrier delegation off. When a workspace uses its own carrier, its traffic can be billed through that carrier.
Delegation grants configuration control. It does not provision a trunk, buy a number, or assign an agent. The workspace still needs the underlying service and assignments.
Sync numbers to the voice provider
In Phone numbers, open the number's Sync menu and choose Sync to Native Agent (Inspra), Sync to VAPI, or Sync to Retell as appropriate. Use the provider assigned to the workspace, and review the result before testing a call.
Manage Atom numbers and releases
The Atom numbers tab has a separate provider connection. If it is not connected, enter the Atom access token and select Connect. Once connected, use Sync to refresh inventory and open a number to review its workspace use and recent call activity.
To request a release, select the intended numbers and choose Add to release queue. Open Release queue, review recent-call warnings, and copy the prepared request. Send it to your Atom account manager, then mark the request as sent. Queuing or marking a request does not itself cancel a number with the carrier.
Test before handing over
- Open the client workspace using Back to Workspaces.
- Call the assigned number and confirm the intended agent or destination answers.
- Place an outbound test if outbound calling is enabled. Check the presented caller ID and audio in both directions.
- Test transfers, after-hours routing, and failover if you configured them.
- Confirm the call record and expected recording are available in the workspace.
Troubleshoot common problems
| Problem | What to check |
|---|---|
| Trunk verification fails | Check the SIP host, authentication mode, credentials or peer IP, transport, port, and carrier network allowlist. Read the reported failure reason. |
| A number will not save | Complete the number, friendly name, trunk, and workspace. External and SIP destinations also require their destination fields. |
| The inbound agent list is empty | Confirm that the selected workspace contains the intended agent. |
| The wrong destination answers | Check workspace and agent assignments, inbound destination, office hours, rerouting, and failover. |
| A client cannot edit a setting | Check the corresponding delegation switch, any dependency, and the user's workspace access. |
| Calls fail after the number is saved | Confirm carrier provisioning, trunk verification, provider connection and sync, permitted call direction, and blocked-number rules. |
For an unresolved issue, raise a support ticket with the workspace, affected number, call time and timezone, call identifier if available, and the observed error.